리포팅 자동화
Reproducible and automated reporting.
Reproducible and automated reporting
Highlights
- 재현가능한 리포팅
- 1. Word
- 2. Excel
- 3. PDF
-
4. HTML
- 다이내믹 문서
- 1. 데이터 변경으로 리포트 업데이트
-
2. 하나의 명령 또는 do-파일을 실행하여 문서 전체를 자동으로 변경
- 정형화된 텍스트와 Stata 실행 결과를 상호 혼합
- Markdown에서 Word 문서 작성
- Word 문서에 머리글, 바닥글, 페이지 번호 및 하이퍼링크 포함
- HTML을 Word로, Word를 PDF로 변환
Stata의 명령어를 사용하면 Stata에서 생성한 요약통계량, 회귀분석 결과 및 그래프 뿐만 아니라 정형화된 텍스트가 포함된 완벽한 Word®, Excel®, PDF 및 HTML 문서를 이용하여 보고서를 만들 수 있습니다.
보고서 작성을 위한 Stata의 명령어는 다음과 같은 두 가지 종류로 제공됩니다:
1) 다이내믹 문서 명령어
이러한 명령어는 Stata 명령어의 전체 출력을 통합하는 텍스트 파일, HTML 파일 및 Word 문서를 만듭니다. Markdown 텍스트 형식 언어를 사용하여 보고서의 모양을 사용자 정의할 수 있습니다.
2) put* 명령어군 — putdocx, putpdf, 및 putexcel
이러한 명령어들은 Stata 명령문의 수행 결과를 문서의 정형화된 텍스트 및 표에 삽입하는 Word 문서, PDF 및 Excel 파일을 만듭니다.
아래에서 이러한 명령의 차이점을 설명하겠습니다.
다이내믹 문서 명령어를 선택하든 put* 명령어군을 선택하든 상관없이 다음과 같은 문서를 작성할 수 있습니다
- 재현가능
Stata를 사용하면 재현 가능한 조사를 쉽게 할 수 있습니다. 예를 들어, version 18 명령문은 지금부터 10년, 20년 또는 그 이상 후에 실행되는 모든 명령에서 동일한 결과를 만들 수 있습니다. datasignature 명령어를 사용하면 데이터가 변경되지 않았는지 확인할 수 있습니다. 이러한 재현성 명령어를 보고서를 작성하는 do-파일이나 텍스트 파일에 통합하면 보고서도 재현할 수 있습니다.
- 다이내믹
어쩌면 새로운 데이터를 기반으로 결과를 업데이트하면서 매달 동일한 보고서를 작성해야 할 수도 있습니다. 업데이트된 데이터셋으로 보고서를 만들었던 명령문을 다시 수행하기만 하면 됩니다. 보고서의 모든 Stata 결과는 자동으로 업데이트됩니다.
보고서를 더욱 쉽게 생성할 수 있도록 했습니다:
- dyndoc 명령어와 markdown 명령어는 이전에 작성한 HTML 문서와 함께 Word 문서를 작성합니다. 전체 Stata 수행결과 출력과 그래프를 쉽게 Markdown 형식의 텍스트와 통합하여 맞춤형 Word 문서를 작성할 수 있습니다.
- Do-파일 편집기는 Markdown 언어 요소에 대한 구문 강조 표시를 제공합니다.
- putdocx 명령어를 사용하면 머리글, 바닥글, 페이지 번호 및 하이퍼링크를 포함할 수 있으며 페이지 여백을 제어할 수 있습니다. 또한 여러 단락이 포함된 텍스트 블록을 포함하여 큰 텍스트 블록을 작성하는 것이 더 쉬워집니다.
- html2docx 명령어는 CSS를 포함한 HTML 문서를 Word 문서로 변환합니다.
- docx2pdf 명령어는 Word 문서를 PDF로 변환합니다.
또한 Stata의 모든 리포트 기능은 Stata Reporting Reference 매뉴얼에 나와 있습니다. 매뉴얼에는 작업의 흐름을 보여주고 Stata를 사용하여 만든 Word, PDF, Excel 및 HTML 문서를 사용자 정의하는 방법에 대한 지침을 제공하는 많은 예제가 포함되어 있습니다.
어디 한번 해볼까요?
보고서를 만드는 것이 얼마나 쉬운지 확인하기 위해 각 명령어를 실행 중인 상태로 보여드리겠습니다.
- 다이내믹 문서 명령어
1. HTML 문서 생성
2. Word 문서 생성
3. 스타일 변경을 위한 CSS 생성
- put* 명령어군
1. Word 문서 생성
2. PDF 생성
3. Excel 파일 생성
다이내믹 문서 명령어
다이내믹 문서 명령어 중 하나로 보고서를 작성하려면 먼저 Stata 코드와 문서에 작성할 텍스트가 포함된 텍스트 파일을 작성합니다.
우리는 다이내믹 태그를 사용하여 Stata 코드를 처리하고 Stata 명령문의 수행 결과를 텍스트 파일, HTML 파일 또는 Word 문서에 포함하려고 합니다. 우리는 다이내믹 태그와 함께 속성을 사용하여 출력을 수정할 수 있습니다. 예를 들어, 우리는 명령어를 보여주지 않고 Stata 수행결과를 포함할 수 있습니다. 우리가 이러한 다이내믹 태그를 Markdown 형식의 텍스트와 결합하면 HTML이나 Word로 잘 정형화된 보고서를 만들 수 있습니다.
1. HTML 문서 생성
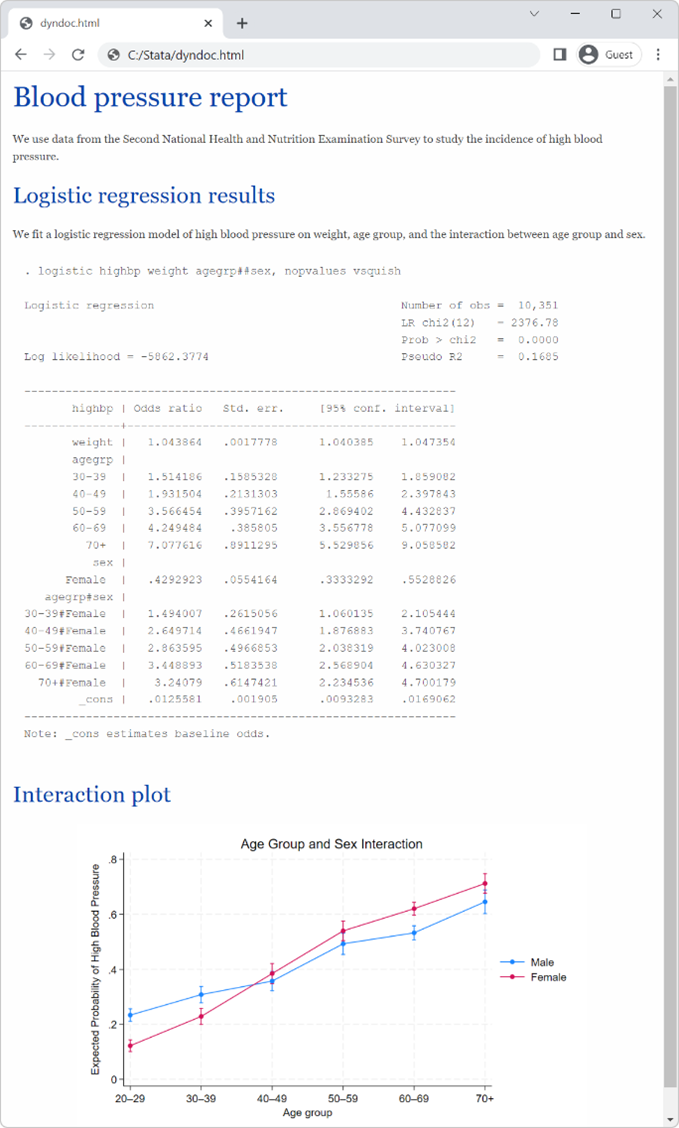
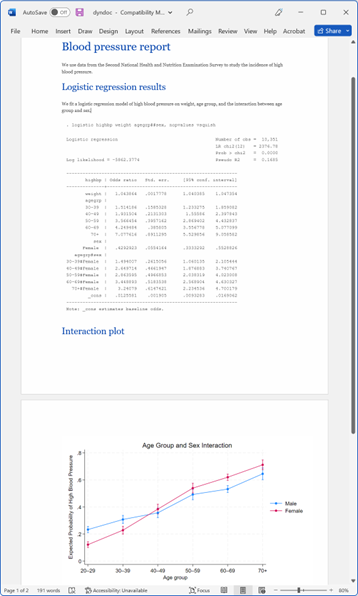
우리가 로지스틱 회귀 분석의 출력과 marginsplot 명령어로 생성된 예측확률 그래프를 포함하는 고혈압 보고서를 만들어 보겠습니다. 아래는 <<dd...>>와 Markdown 형식의 텍스트와 유사한 Stata 다이내믹 태그가 있는 텍스트 파일입니다.
<<dd_version: 2>>
<<dd_include: header.txt>>
Blood pressure report
===============================================================
  고혈압 발생률 연구를 위해 제2차 국민건강영양조사 자료를 활용합니다.

<<dd_do: quietly>>
webuse nhanes2, clear
<</dd_do>>
## Logistic regression results
고혈압이 체중, 연령대, 성별 및 연령대와 성별 간의 상호작용에 미치는 로지스틱 회귀분석
모형을 추정합니다.
  ~~~
<<dd_do>>
logistic highbp weight agegrp##sex, nopvalues vsquish
<</dd_do>>
~~~
##상호작용 그래프
<<dd_do: quietly>>
margins agegrp#sex
marginsplot, title(Age group and sex interaction)        ///
         ytitle(Expected probability of high blood pressure)    ///
         legend(ring(0) bplacement(seast) col(1))
<</dd_do>>
<<dd_graph: saving("interaction.png") replace height(400)>>
<</dd_graph>>
텍스트 파일 상단에 텍스트 파일 변환을 하기위한 최소 버전을 지정했습니다. 문서 포맷에 사용되는 HTML 코드가 포함된 header.txt 파일도 포함했습니다.
(간단한 텍스트를 만들어 header.txt라는 이름으로 저장, 상기 코드로 dyndoc.txt 파일도 만들어 Stata 작업 폴더에 저장한 후 따라해보기)
보고서 제목에는 등호(===)를 사용하고 섹션 제목에는 더블 파운드 기호(##)를 사용했습니다. 또한 실행하고자 하는 Stata 명령에는 <<dd_do>> 다이내믹 태그를 사용하고 webuse와 margins의 수행결과를 출력하지 않기 위해 quietly 속성을 지정했습니다.
HTML 형식으로 보고서를 생성하려면 다음과 같이 입력하면 됩니다.
. dyndoc dyndoc.txt, replace그러면 아래와 같은 dyndoc.html 파일이 생성됩니다:
2. Word 문서 생성
아래와 같이 입력하면 텍스트 파일로 Word 문서를 만들 수 있습니다.
. dyndoc dyndoc.txt, docx replace그러면 아래와 같은 dyndoc.docx라는 파일이 생성됩니다:
put* 명령어군
putdocx, putpdf 및 putexcel 명령어를 사용하여 Word, PDF 및 Excel로 맞춤형 보고서를 만들 수 있습니다. 이 명령어들을 사용하면 내보내는 표와 텍스트의 레이아웃과 내용을 설정할 수 있습니다.
1. Word 문서 생성
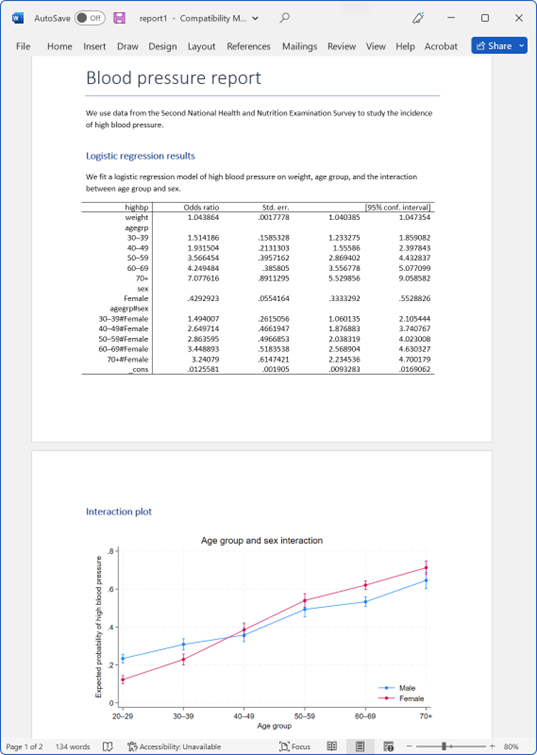
다음 do-파일을 실행하면 위에서 만든 것과 동일한 내용의 Word 문서를 만들 수 있습니다:
webuse nhanes2, clear
putdocx begin
// Add a title
putdocx paragraph, style(Title)
putdocx text ("Blood pressure report")
putdocx textblock begin
We use data from the Second National Health and Nutrition Examination Survey  to study the incidence
  of high blood pressure.
putdocx textblock end
// Add a heading
putdocx paragraph, style(Heading1)
putdocx text ("Logistic regression results")
putdocx textblock begin
We fit a logistic regression model of high blood pressure on  weight, age group, and the interaction
between age group and sex.
putdocx textblock end
logistic highbp weight agegrp##sex, nopvalues vsquish
// Add the coefficient table from the last estimation command
putdocx table results = etable
putdocx paragraph, style(Heading1)
putdocx text ("Interaction plot")
margins agegrp#sex
marginsplot, title(Age group and sex interaction)        ///
        ytitle(Expected probability of high blood pressure)    ///
    legend(ring(0) bplacement(seast) col(1))
graph export interaction.png, replace
putdocx paragraph, halign(center)
// Add the interaction plot
putdocx image interaction.png
putdocx save report1, replace
개별 putdocx 명령어는 문서 작성을 시작하고, 제목과 다른 텍스트를 추가하고, 추정 결과를 포함하고, 그래프를 추가합니다. 이 명령어를 실행하면 report1.docx 파일이 생성됩니다.
추가적으로 문서를 맞춤화할 수도 있습니다. putdocx 명령어를 추가하면 머리글, 바닥글, 페이지 번호, 제목, 자막, 그리고 다양한 형식을 가진 섹션으로 완성된 문서를 만들 수 있습니다. 또한 여러 파일을 추가하고 Stata의 기능과 Word의 기능을 상호 작용하게 할 수도 있습니다.
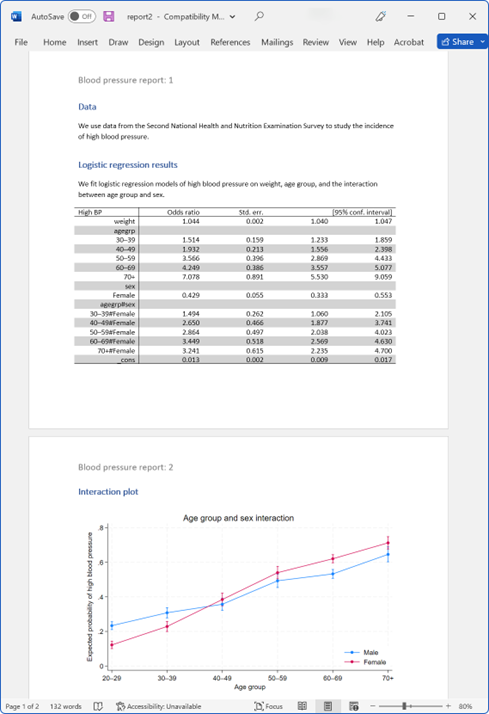
예를 들어, 머리글, 페이지 번호 및 형식이 지정된 회귀분석 결과 표로 report1.docx의 수정된 버전을 만들기 위해 다음 작업 파일을 만들었습니다:
webuse nhanes2, clear
// Create a document with a header
putdocx begin, header(head)
// Define the header content, and include page numbers
putdocx paragraph, toheader(head) font(,14)
putdocx text ("Blood pressure report: ")
putdocx pagenumber
putdocx paragraph, style(Heading1)
putdocx text ("Data")
putdocx textblock begin
We use data from the Second National Health and Nutrition Examination Survey to study the incidence
of high blood pressure.
putdocx textblock end
putdocx paragraph, style(Heading1)
putdocx text ("Logistic regression results")
putdocx textblock begin
We fit logistic regression models of high blood pressure on weight, age group, and the interaction
between age group and sex.
putdocx textblock end
logistic highbp weight agegrp##sex, nopvalues vsquish
putdocx table results = etable
// Add a background color to alternating rows of the table
putdocx table results(3 5 7 9 11 13 15 17,.), shading(lightgray)
// Format the estimation results to have three decimal places
putdocx table results(2/17,2/5), nformat(%5.3f)
putdocx table results(1,1) = ("High BP")
putdocx paragraph, style(Heading1)
putdocx text ("Interaction plot")
margins agegrp#sex
marginsplot, title(Age group and sex interaction)        ///
      ytitle(Expected probability of high blood pressure)    ///
    legend(ring(0) bplacement(seast) col(1))
graph export interaction.png, replace
putdocx paragraph, halign(center)
// Specify the height of the image to be 5 inches
putdocx image interaction.png, height(5 in)
putdocx save report2, replace
이 문서 파일을 실행하면 다음과 같은 Word 문서가 생성됩니다:
putdocx 명령어를 사용하여 Word 문서를 작성하는 방법에 대한 자세한 내용은 [RPT] putdocx intro를 참조하십시오.
2. PDF 생성
dyndoc.docx와 동일한 내용의 PDF를 만들 수 있습니다. 이전 docx1.do 파일을 수정하여 putdocx를 putpdf로 대체하고 기타 사소한 편집을 할 것입니다:
  version 18
  webuse nhanes2, clear
  // Create a PDF document for export
  putpdf begin
  // Add a title, and center it horizontally
  putpdf paragraph, font(,20) halign(center)
  putpdf text ("Blood pressure report")
  putpdf paragraph
  putpdf text ("We use data from the Second National Health and Nutrition ")
  putpdf text ("Examination Survey to study the incidence of high blood pressure.")
  putpdf paragraph, font(,16)
  putpdf text ("Logistic regression results")
  putpdf paragraph
  putpdf text ("We fit a logistic regression model of high blood pressure on ")
  putpdf text ("weight, age group, and the interaction between age group and sex.")
  logistic highbp weight agegrp##sex, nopvalues vsquish
  // Export the table of estimation results
  putpdf table results = etable
  // Begin the following content on a new page
  putpdf pagebreak
  putpdf paragraph, font(,16)
  putpdf text ("Interaction plot")
  margins agegrp#sex
  marginsplot, title(Age group and sex interaction)        ///
        ytitle(Expected probability of high blood pressure)    ///
        legend(ring(0) bplacement(seast) col(1))
  graph export interaction.png, replace
  // Add the interaction plot and center the image
  putpdf paragraph, halign(center)
  putpdf image interaction.png
  putpdf save report, replace
이 do-파일을 실행하면 report.pdf 파일을 얻을 수 있습니다:
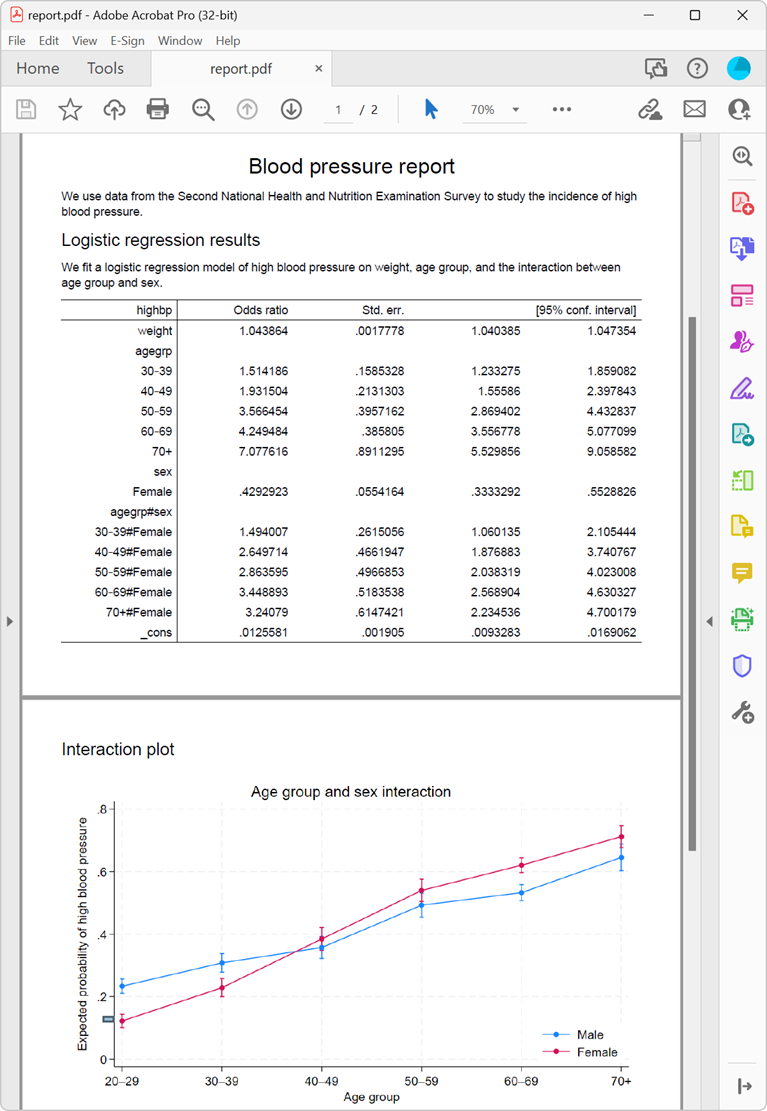
putpdf 명령어는 putdocx 명령어와 매우 유사하며, put 명령어군에는 텍스트, 테이블 및 이미지를 내보내기 위한 명령어가 포함되어 있습니다.
putpdf 명령어를 사용하면 문서의 페이지 마진과 내보내는 모든 표의 마진 크기를 설정할 수 있습니다. 또한 그래프 크기를 변경하고 레이아웃이 다른 섹션으로 문서를 나눌 수 있습니다.
PDF 형식으로 보고서를 작성하는 방법에 대한 자세한 내용은 [RPT] putpdf intro를 참조하십시오.
3. Excel 파일 생성
마지막으로 Stata 결과와 그래프를 Excel 파일로 내보내는 방법을 보여줍니다. 아래 do-파일을 사용하여 Excel 형식의 혈압 보고서 버전을 만들 수 있습니다:
  version 18
  webuse nhanes2, clear
  // Set the report.xlsx workbook for export
  putexcel set report.xlsx, replace
  // Add a title
  putexcel A1 = "Blood pressure report", bold
  putexcel A1:E1, border(bottom, thick) merge hcenter
  putexcel A3 = "We use data from the Second National Health and "
  putexcel A4 = "Nutrition Examination Survey to study the "
  putexcel A5 = "incidence of high blood pressure."
  // Add a heading for the regression results
  putexcel A7 = "Logistic regression results"
  putexcel A7:E7, border(bottom, double)
  putexcel A9 = "We fit a logistic regression model of high blood"
  putexcel A10 = "pressure on weight, age group, and the "
  putexcel A11 = "interaction between age group and sex."
  logistic highbp weight agegrp##sex, nopvalues vsquish
  // Export the table of estimation results
  putexcel A13 = etable
  putexcel D13:E13, merge
  putexcel G7 = "Interaction plot"
  putexcel G7:I7, border(bottom, double)
  margins agegrp#sex
  marginsplot, title(Age group and sex interaction)        ///
        ytitle(Expected probability of high blood pressure)    ///
    legend(ring(0) bplacement(seast) cols(1))
  graph export interaction.png, replace width(550) height(400)
  // Export the interaction plot
  putexcel G9 = image(interaction.png)
  putexcel save
putexcel 명령어를 사용하여 텍스트와 결과를 표시할 셀을 지정합니다. 셀 경계와 같은 표 요소의 형식을 지정하는 명령도 추가합니다.
위에 표시된 do-file을 실행하면 다음과 같은 Excel 파일이 생성됩니다:
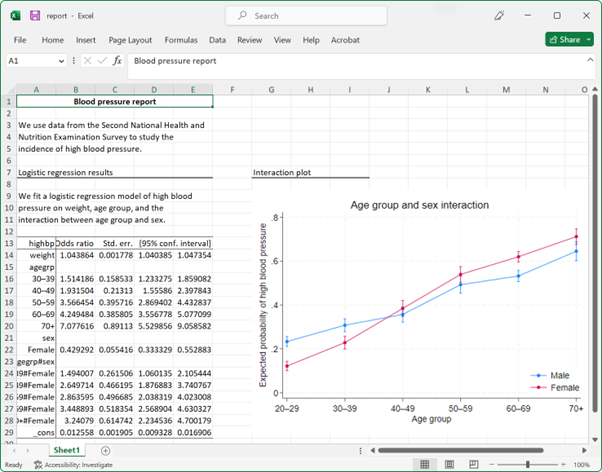
통계 형식 지정, 열 라벨 수정, 글꼴 정렬 변경 등을 통해 이 문서를 추가로 사용자 정의할 수 있습니다. 몇 가지 추가 putexcel 명령을 사용하면 Stata 내에서 최종 보고서를 완전히 사용자 정의할 수 있습니다.
아래에 표시된 작업 파일에서 상호 작용 항에 대한 긴 레이블을 다루기 위해 다른 글꼴 유형과 크기를 사용하도록 font("Arial Narrow", 11)을 지정합니다. 또한 nformat(number_d2) 옵션을 포함하여 추정 결과를 소수점 두 자리로 구성합니다.
  webuse nhanes2, clear
  version 18
  putexcel set report2.xlsx, replace
  putexcel A1 = "Blood pressure report", bold
  putexcel A1:E1, border(bottom, thick) merge hcenter
  putexcel A3 = "We use data from the Second National Health and "
  putexcel A4 = "Nutrition Examination Survey to study the "
  putexcel A5 = "incidence of high blood pressure."
  putexcel A7 = "Logistic regression results"
  putexcel A7:E7, border(bottom, double)
  putexcel A9 = "We fit a logistic regression model of high blood"
  putexcel A10 = "pressure on weight, age group, and the "
  putexcel A11 = "interaction between age group and sex."
  // Specify the font type and size
  putexcel A1:A11, font("Arial Narrow",11)
  logistic highbp weight agegrp##sex, nopvalues vsquish
  // Export the table of estimation results
  putexcel A13 = etable
  // Format statistics to have two decimal places
  putexcel B14:E29, nformat(number_d2)
  putexcel A13:E29, font("Arial Narrow",9)
  putexcel A15, left
  putexcel A21, left
  putexcel A23, left
  // Merge columns with the C.I. label.
  putexcel D13:E13, merge
  putexcel G7 = "Interaction plot", font("Arial Narrow",11)
  putexcel G7:I7, border(bottom, double)
  margins agegrp#sex
  marginsplot, title(Age group and sex interaction)        ///
        ytitle(Expected probability of high blood pressure)    ///
    legend(ring(0) bplacement(seast) cols(1))
  graph export interaction.png, replace width(550) height(400)
  // Export the interaction plot
  putexcel G9 = image(interaction.png)
  putexcel save
이 do-파일을 실행하면 report2.xlsx 파일을 얻을 수 있습니다:
Stata 결과 및 그래프를 Excel 파일로 내보내는 방법에 대한 자세한 내용은 [RPT] putexcel을 참조하십시오.
추가 설명
Word, HTML, PDF 또는 Excel을 사용하여 보고서를 만들든 Stata의 보고서 기능을 사용하면 명령을 실행하고 결과와 함께 사용자 정의 보고서를 동시에 작성할 수 있습니다.
Stata 블로그에서 dyndoc 참조: Revealed preference: Stata for reproducible research